MARCH 2007
www.acdsee.com

ACDSee Pro as Mobile Studio
Serge Timacheff is the epitome of a professional photographer on the go. As the Official Photographer for the Fédération Internationale d'Escrime (International Fencing Federation), he constantly travels to the world’s top fencing competitions to capture the power and grace of Olympic-calibre athletes. 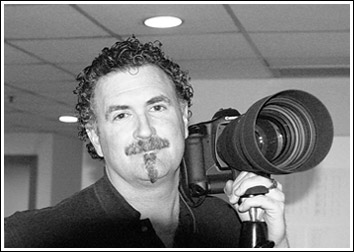
Serge’s photos of fencing events are news, as well as art, and they need to be delivered to the FIE and Corbis’s editorial department as quickly as possible. This means that Serge must complete his entire workflow – from capture, import, tag, cull, edit, catalog and rename to e-mail, post and archive – in just a few hours. He’s alleviated this high-pressure situation by integrating ACDSee Pro into every aspect of his workflow..
” It’s essential that I be able to quickly take 1,600 photos and boil them down to the ones I can send to their various destinations, like my clients at Corbis or my online galleries. With ACDSee I can rename, select, and then quickly copy photos to their proper folders. There is no other program where I can do this so easily. ACDSee gives me optimal access to all my photos, and allows me to tag and name them in a way that is useful to both myself and the client.”
ACDSee Releasing Public Beta of Pro 2.0 this Spring

The ACDSee team is busy working on ACDSee Pro 2.0 for release later this year. We are looking forward to giving a sneak preview this spring when you will have the opportunity to try out and provide feedback on our work in progress through our new Pro Public Beta program.
When you download Pro Beta, you'll see the beginnings of what will be improvement in our RAW support, along with some of the exciting new features you will find in Pro 2.0.
With your feedback on the public Beta, we’ll make sure Pro 2.0 is faster, more intuitive and has the power you need to cut even more hours out of your workflow.
New in ACDSee Pro Public Beta
- Works on Windows Vista
- Improved RAW support
- Faster viewing
- Better demosaicing for improved image quality and detail
- Copy RAW settings to multiple images
- Crop and rotate RAW images
- Save RAW images to multiple formats
- New batch edit functionality
- Apply shadows/highlights
- Time stamp shifting
- Extended browsing capabilities
- Auto Categories
- Filter By
- Group By
- Private Folders
- Events Calendar View
- More creative power
- Channel mixer
- PowerPoint presentation wizard
- More print layouts
If your camera doesn’t sharpen quite the way you like, correct it in ACDSee Pro.
Sharpening works by detecting edges and boosting contrast at those edges. To remove blurry edges and make your transitions more natural and crisp, use the Unsharp Mask tool. Unlike other sharpening methods, the Unsharp Mask tool allows you to control the amount of sharpening and how it is applied.
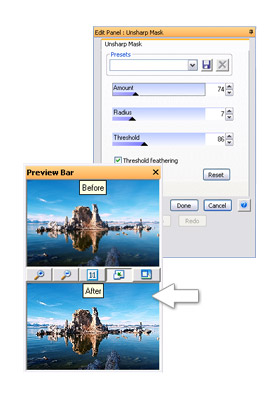
Remember to perform all your color corrections and noise reductions before sharpening
Sharpen an image using the Unsharp Mask tool:
- In Edit Mode, on the Edit Panel, click Sharpness, and then select the Unsharp Mask tab.
- Use the zoom slider in the top right corner of the screen or the Actual Size button (1:1) to enlarge the photo so you can see all the details.
- Drag the Amount slider to adjust the amount of sharpening that will be applied. The higher the amount of sharpening applied, the stronger the contrast will be at the edges. The default is 100, which gives photos a nice crisp look.
- Use the Radius slider to adjust the region along the edges where sharpening is applied. The amount of sharpening applied is strongest at the edge and gradually decreases as the radius increases. The default setting of 5 pixels may be enough.
- Drag the Threshold slider to adjust how much difference there must be between the lightness values of adjacent pixels for the pixels to be sharpened. The higher the threshold value, the greater the lightness difference must be between adjacent pixels for sharpening to be applied.
- If you like how your settings have sharpened your photo and would like to use these settings on other images, click the Save Preset to store all these settings for future use.
- Click Done to apply your changes and close the Unsharp Mask tool.
Events
Wedding and Portrait Photographers International

With over 250 Trade Show Exhibitors, 55 platform speakers, 33 MasterClasses and more, WPPI is one of the biggest and best photography convention and trade shows around.
Come visit us at WPPI in Las Vegas, Nevada at booth #253, between Monday, March 26th and Wednesday, March 28th. We’ll be giving demos of our ACDSee products and answering any questions you may have. The show promises to be a great success, jam-packed with resources and fun for digital photographers.


Get WS_FTP PhotoMover for $29.99
*Regular value of $39.99
With Ipswitch WS_FTP PhotoMover you can select images from multiple folders in ACDSee Pro, then simply drag them to your FTP server or personal Web space. It's as easy as that. Thumbnails of your images appear after they've been transferred, so you can see everything you've posted, as you post it.
Whether you're a professional or recreational photographer, WS_FTP PhotoMover combined with ACDSee Pro will speed up your image transfers and management significantly - giving you a straightforward, fast solution to the challenges of storing images and showing your work to prospective clients online.