APRIL 2007
www.acdsee.com

What is Macro Photography?

In true macro photography, the image projected on a camera’s film or digital sensor is the same size as the subject. It is also referred to as "life-size magnification" or simply 1:1.
Many people now use the term ‘macro photography’ more broadly, referring to the close-up photography of small things. With macro photography, we are brought into a world we usually only see in glances, a world of giant insects, birds, flowers, and dewdrops.
Macro photography is one of the most compelling reasons to get a digital SLR, but it can also be accomplished on some point and shoot digital cameras.
If you have a DSLR camera, there’s great info at http://www.photo.net/learn/macro/. For a great article on point and shoot macro, read below:
Macro Photography Tips for Point and Shoot Compact Digital Cameras
By Darren Rowse, founder, Digital Photography School
Much has been written on the topic of Macro photography for those photographers fortunate enough to own a DSLR with macro lenses - but what about if you own a compact point and shoot camera? Can you get great macro shots too?
While the results achievable with a point and shoot camera in macro mode probably won’t compare with a DSLR with a purpose built macro lens I’ve still seen some remarkably good shots with compact cameras (all three shots in this post were taken with compact cameras). Here are a few tips to help you get the most out of yours:
Select Macro Mode - this is a fairly obvious first step but I’m always surprised by how many digital camera owners haven’t explored the shooting modes that their camera has. Macro mode is generally symbolized with a little flower and when selected it will tell your camera that you want to focus on a subject closer to your lens than normal (the minimum distance allowed will vary from camera to camera - consult your instruction manual to find yours). Macro mode will also usually tell your camera to choose a large aperture so that your subject is in focus but the background is not.
Use a Tripod - in macro photography a tripod can be particularly useful, even if you’re just shooting with a compact camera. Keeping your camera still not only improves your shots (getting rid of camera shake) but it allows you to play around with different settings without losing your composition.
Aperture - once in macro mode some cameras will not allow you to make many other adjustments but if you are able to play with your aperture settings it can be well worthwhile to do so. As we’ve covered in our Aperture tutorials, the main thing that aperture impacts is the depth of field of your shots. Choose a small aperture (big number) if you want a large depth of field with everything in focus or a large aperture if you just want your main subject in focus. In macro photography you’ll probably want a shallow depth of field so select the largest aperture available.
Focusing - I find that in macro photography it is helpful to have full control over focusing - especially when you have shallow depth of fields where it is all the more important to make sure the right part of your shot is in focus. If your camera allows manual focusing select this option and manually focus on the part of our subject that is the main point of interest.
Composition - remember some of the basic rules of composition like the Rule of Thirds. Make sure your image has a main point of interest and place that focal point in a smart position in your image in order to draw the eye of your viewer. Try to select a non cluttered or simple background for your main subject so as it doesn’t compete with it visually.
Flash - in many macro shots having some artificial light is important. The challenge with compact cameras is that most give you limited control of your flash. As a result choosing a good time of day when there is plenty of available light is probably your best bet. If you do need more light check to see if your camera allows you to pull back the level that your flash fires at. Alternatively you might like to try diffusing it in some way (tissue paper or cellotape over the flash for example). Another option might be to use some other source of artificial light or to invest in a reflector to help make the most of available light. Experiment with different methods of lighting your subject.
Take Your Shot - once you have your shot lined up and in focus take your shot. Make sure once you’ve taken it to take a good look at it on your LCD, zooming in to make sure that your focusing is sharp. Try shooting at slightly different apertures, with different compositions and focusing on different points of your subject to see what works best.
Macro Lens Attachments - some compact cameras actually have accessories available to help with macro/close up photography. These will enable you to enlarge your subject and/or decrease your minimum focal length. These might be worth investing in if you intend on doing a lot of macro work.
Self Timer - (this point was added as a result of comments below - thanks team!) when using my DSLR for Macro work I tend to use a shutter cable release and tripod to make sure my shots are completely still (to eliminate the small amount of camera shake from pressing the shutter). Most compact cameras don’t have cable releases but a simple way around this is to use your camera’s self timer on it’s shortest time setting which will similarly mean you have no movement of your camera when taking your shot (if you’re taking notice of the ‘use a tripod’ tip above).
Stop and smell the flowers: Macro Photo Screensavers
Create a gorgeous and startling screensaver in ACDSee 9 with a series of macro photographs.
- Select your macro photos.
- Resize or crop your photos to match the resolution of your monitor. This allows your screensaver to fill your screen without distortion or pixelation.
If you are resizing, make sure that ‘Preserve original aspect ratio’ is checked.
We batch resized our photos to 1024 x 768. - Select Create Slideshow in the Create menu.
- Select Screensaver as your slideshow type under ‘Create a new slide show’.
- Design your transition.
We used the Fade transition, advancing every 5 seconds - Save your project.
Creating slideshows is just as easy! Just select Flash or Standalone in step 3 instead of Screensaver.
Download our macro screensaver. All images are entries to the ACDSee Photo Contest!
Scrapbook your Garden
Showcase your blooms in a scrapbook page created in ACDSee Photo Editor.
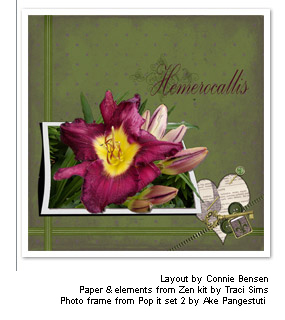
- Create your working space
- Open the digital paper you are using as your background
- Place the ‘bent frame’ element
- Place the flower photo on top of the frame & resize
- Make your flower pop out of the frame
- Change the opacity of the flower to 50% in the Object Palette so the frame can be seen underneath
- Select the Eraser tool and erase the areas around the flower that appear outside of the frame.
- Tip: Adjust the hardness of the Eraser to 60 and reduce the brush size when working close to the flower
- When finished erasing, change the opacity back to 100%
- Add a Drop Shadow to your flower
- Group the frame, shadow and photo objects and resize if necessary
- Embellish your page
- Add other elements and move them below the Group in the Object Palette.
- Name your flower
- Select a font and add your flower’s name
- Add an image under the text. Reduce the opacity of this stamp to enhance the text.
Take our free Pro Beta for a test drive

You are invited to test a beta version of ACDSee Pro, available soon at www.acdseepro.com.
Our software development starts and ends with the needs of today’s photographers, so please provide us with feedback on the beta at forums.acdsystems.com. Your feedback will shape the next version of Pro, anticipated for release this fall.
Known as the best workflow manager for today’s photographers, ACDSee Pro has grown to become a valuable tool for quickly processing the ever-expanding variety of RAW formats from digital camera manufacturers, especially for the new generation of DSLRs.
Beta testers will get a preview of ACDSee Pro’s new tools, including color separation and enhanced RAW processing.
The beta version is compatible with Windows Vista.
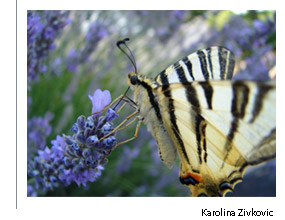
Macro Inspiration
Get inspired by the monthly and weekly winners of our macro photo contest.
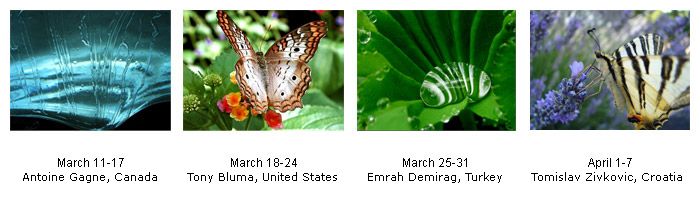
Submit your photos starting April 26th for our next photo contest, on Architecture.


Get 9 & Editor & 1GB SanDisk SD memory card *Offer expires April 30!
ACDSee goes beyond any other photo software in making it fun, fast and easy to find and share your memories. And now, ACDSee 9 and ACDSee Photo Editor provide the highest quality experience possible on Windows Vista.
Get all this and a 1GB SanDisk SD Card too, for one special price. Only until April 30, 2007.
SanDisk 1GB SD Card
- 1GB of storage capacity
- Use in your camera, phone, handheld PC, or MP3 player
- 5 year guarantee
- Weighs only two grams!
Add to Cart - $99.99 USD
Value of $164.97