Using the Blend effect, create gradual transitions in shape, color, and stroke width between two or more objects. Canvas generates a series of objects (from back-to-front through the stacking order) that appear to transform one object into another.
Canvas can blend solid color inks only. If you blend objects with hatches, symbols, textures, or gradients, Canvas generates the blend objects but doesn’t fill them with an ink.
Artists often use blends to create highlights and shadows in vector drawings that provide the illusion of roundness and lighting. In addition, use blends to copy and evenly distribute objects around shapes to create borders.
|
# of shapes |
The number of objects Canvas creates for the blend. Higher numbers result in smoother blends. |
|
Rainbow colors |
Creates a rainbow-like blend of colors between objects. This introduces more color variations than a standard blend, which uses only combinations of the original colors. When you turn on this option, two buttons appear; choose a clockwise or counter-clockwise path around the color wheel. |
|
Bind to a path |
Select to use the path of an object (not in the current selection) to arrange blend objects. Click Apply and then you have to choose a path. Click the object to which you want to bind the blend objects. |
|
Point to point |
Available when blending two objects. This option lets you rotate blend objects, creating the illusion that one object is twisting into another. When you click Apply, Canvas prompts you to Choose 1st Point; click an anchor point on one object. Canvas then prompts you to Choose 2nd Point; click an anchor point on the other object. To reverse the blend direction, Ctrl-click when you choose the two points. |
|
Dynamic |
Lets you use the Direct Selection tool (hollow arrow) to accelerate, decelerate, expand, contract, and redirect the blend after Canvas creates it. Dynamic blends aren’t available for specialized objects, such as multigons, spirals, concentric circles, and grids. |
By specifying a high number of blend objects, you can create gradual transitions between shapes and colors. With the appropriate settings, colors seem to fade and mix into each other, and the blend objects do not appear as distinct objects. This effect is often used to add realistic highlights and shadows to objects so they appear three-dimensional.
When configuring the blend settings, remember that the size of the final output affects the number of shapes required to make the blend appear smooth. For large posters, you might need to use a lot of shapes, but fewer shapes are required for small illustrations.
To ensure that blended objects have the same number of anchor points, copy an object, edit its shape, and blend between these objects.
In addition, objects that you blend must have the same number of anchor points for the blend to appear smooth. Canvas uses the anchor points to calculate the steps and shapes in a blend; an inconsistent number of anchor points can cause unwanted twists and distortions.
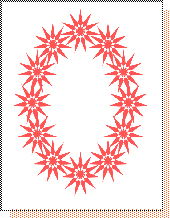
Although blends are often used to create gradual, smooth transitions between shapes and colors, you can also use the Blend command to create and evenly space a pattern across a layout. By specifying a low number of shapes and widely spacing the front and back objects, you can make each blend object a distinct object. This effect can be useful for creating borders and other patterns.
|
|
|
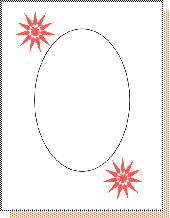
The artist created this border by first creating a flower-like multigon, copying it, and drawing an oval. To distribute the flowers evenly around the oval, the artist selected the two multigons, turned on the “Bind to a path” option in the Blend palette, specified a relatively low number of shapes (10) for the blend, and chose the oval as the binding path.