Selecting areas based on color
You can use the Wand tool and the Color Range command to select pixels in an image according to color.
To select a contiguous area of similarly colored pixels:
Use the Wand tool.
To select all pixels of a particular color:
Use the Color Range command.
To use the Wand tool:
- Select the Wand tool.

Point to the object you want to edit. If the paint object is not in edit mode, the pointer becomes a hand (). Click the object to put the image in edit mode. The pointer becomes a wand.
- Click the color area you want to select.
- To add to a selection: Shift-click the Wand in the image. The pointer displays a ‘+’ to show that it adds to the current selection.
- To subtract from a selection: Ctrl-click the Wand in the image. The pointer displays a wand with a ‘-’ to show that it subtracts from the current selection.
- To inverse a selection: Choose Image | Select | Inverse or Edit | Invert Selection.
To adjust the tolerance of the Wand tool:
You can broaden or narrow the range of colors the Wand tool selects by adjusting its tolerance; e.g., a tolerance of zero selects pixels that exactly match the color of the pixel you click.
To configure the Wand tool:
Use the settings in the Properties bar. In the Tolerance field, enter a tolerance value from zero to 255. The Select throughout image option lets you select the chosen color in the entire image. To smooth the edges of the selection, turn on the Anti-Aliased option.
Selecting a color range
You can use the Color Range command to select all areas of similar color in an image. The command creates a grayscale selection mask similar to an alpha channel.
You can use the Load and Save buttons in the dialog box to work with color range selection files. The file format that Canvas uses for these files is compatible with Photoshop Color Range files. On Windows, these files use the extension AXT.
To select a color range interactively:
- With a paint object in edit mode, choose Image | Select | Color Range.
- In the Color Range dialog box, choose Sampled Colors in the Select menu.
- Adjust the Fuzziness setting. To select pixels of exactly the same color, set the Fuzziness to zero. Increase the Fuzziness to widen the range of colors to be selected.
- Click a color in the preview image in the dialog box. Canvas selects a range of similarly colored pixels, depending on the Fuzziness setting.
- To add colors to the selection, click the ‘+’ dropper icon, then click a color in the image in the dialog box.
- To subtract colors from the selection, click the ‘-’ dropper icon, then click in the image in the dialog box.
- To view the selected pixels, click the Selection option. Gray areas indicate pixels that the Color Range command selects at a reduced opacity. Filters and painting tools affect these areas to a lesser degree than areas that are 100 percent selected. Click OK to apply the selection to the image.
Color Range options
Use this dialog box to select image areas based on color.
|
Select
|
In the menu, choose the color (red, green, blue, cyan, magenta, yellow), or tonal range (shadows, midtones, highlights) you want to select.
To select a color interactively by clicking in the preview window, choose Sampled Colors.
|
|
Fuzziness
|
When using the Sampled Colors option, enter a low value to select a narrow color range; enter a higher value to select a wider range.
|
|
Selection
|
Choose Selection to preview the selection, with white representing selected pixels, in the preview window.
|
|
Image
|
Choose Image to see the actual image so you can sample colors with the dropper.
|
|
Dropper
|
With Sampled Colors chosen, click the dropper in the preview window to select colors. Use the ‘+’ dropper to add to the selection; use the ‘-’ dropper to subtract from it.
|
|
Selection Preview
|
Choose an option to preview the selection in the image itself (or choose None for no preview). Grayscale shows the selection as it would appear in a channel, with white for selected pixels and black showing non-selected areas.
The Matte and Mask options show the original colors in selected areas. In non-selected areas, Black Matte shows black, White matte shows white, and Mask shows transparent red.
|
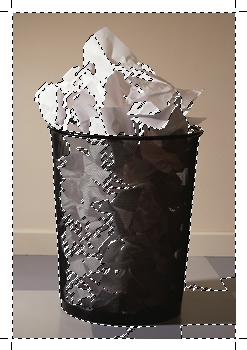
Selecting unselected areas
Use the Inverse command to simultaneously select all pixels not in the current selection while deselecting the current selection.
To select areas not included in the current selection:
Choose Image | Select | Inverse.
|
|
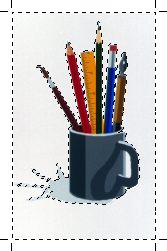
A moving dashed edge surrounds the background, a selected area
|
|
|
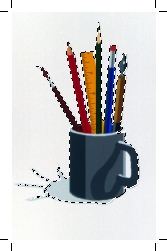
When the selection is inversed, the cup and its contents are selected
|
Expanding selections with Grow and Similar
The Grow and Similar commands let you expand selections to include similar colors in an image. These commands compare the colors outside a selection to the colors in the selection. Colors that are in a specified range of similar colors are added to the selection.
The range of colors selected by Grow and Similar is based on the Tolerance setting in the Wand dialog box (see To adjust the tolerance of the Wand tool:).
The Grow command selects similar colors that are adjacent to the current selection. The Similar command selects similar colors throughout the image.
The Grow and Similar commands are available for all image modes except Black & White.
To use the Grow command:
- Ensure the image is in image edit mode.
To select similar colors throughout an image, you can also use the Select throughout image check box in the Wand dialog box (see To adjust the tolerance of the Wand tool:.
- Select the Wand tool and click it on the area that you want to select (To use the Wand tool:).
- Choose Image | Select | Grow and similar colors that are adjacent to the current selection will be selected.
To use the Similar command:
- Ensure the image is in image edit mode.
- Select the Wand tool and click it on the area that you want to select (see To use the Wand tool:).
- Choose Image | Select | Similar and similar colors throughout the image will be selected.
|
|
Original image
|
|
|
Image after tapping Magic Wand on the indicated area and choosing Image | Select | Grow
|
|
|
Image after choosing Image | Select | Similar.
|
You can repeat the Grow and Similar commands to continue expanding a selection. As more colors are added to the selection, more colors are in the range of colors similar to the selection. Therefore, even though the Tolerance doesn’t change, repeating Grow or Similar can expand a selection incrementally.
Grow and Similar can help you isolate elements in an image, such as dark objects against a light background. Select part of one dark object with the Marquee tool. Choose Grow to expand the selection to the entire object. Choose Similar to expand the selection to all similar colors in the image.